CLICK HERE FOR FREE BLOGGER TEMPLATES, LINK BUTTONS AND MORE! »

Sunday, November 11, 2012

Double Apricot Bread

Last night I was in a baking mood.  So I made some Double Apricot Bread that my hubby had asked me to make sometime.  Boy, did it smell good while baking.  And it tasted even better. :)

A few of you asked if I would share the recipe.   So here it is:

Double Apricot Bread

1 (16 oz.) can apricot halves, drained
3/4 c. flour
3/4 c. whole wheat flour
1 1/4 c. sugar
1/2 tsp. baking powder
1 tsp. salt
1/2 tsp. pumpkin pie spice
2 beaten eggs
1/2 c. milk
3 Tbsp. vegetable oil
1 c. dried apricots, snipped

In blender, blend apricot halves till smooth (or puree them).  Set aside. In large bowl, combine flours, sugar, baking powder, salt and pumpkin pie spice.  In another bowl, combine eggs, the apricot puree, milk and oil.  Add to flour mixture, stirring just till combined.  Stir in dried apricots.  Pour into 2 greased 8x4-inch loaf pans.  I used 4 small loaf pans (Pampered Chefs 4-in-1 loaf stoneware).  Bake in 350 degree oven for 45 to 50 minutes or till toothpick, inserted near center, comes out clean.  Cool in pans 10 minutes.  Remove from pans.  Cool completely.


Pretty simple, isn't it?  One thing I didn't do (well, my hubby didn't do) . . . he didn't let the bread cool completely before slicing some to eat.  He sliced it right out of the oven and it didn't harm it one bit. :)  So if you just can't wait for the bread to cool completely, that's okay . . . the kitchen police will not come pounding on your door. lol  

Enjoy!!!

Till the next time I'm up in the night.  Kathy

Chalenge #38 - Home is Where the Heart is!

This past week on CropChocolate, our challenge was "create a project which contains an image of a house or the word home or both.  For added challenge, use something found in your house - twine from garden, string from toolbox, bottle cap, pull tab from soda can, etc. This is not a requirement but just an added element."

After reading that, I knew exactly what I wanted to do . . . well, I knew that I wanted to use a stamp set I purchased a couple of years ago, but haven't had a project to use it on yet. :)  After thinking about it, I decided to do a small wallhanging. I used cardboard from a CC order box for the backing for extra support and for the extra challenge I photo-copied a page from my dictionary (w/ the definition of "home"). Then I used my "new" stamp sets that are called "layered" stamps on this . . . first you either stamp the outline, then the inside or vice versa.  Here's what I came up with:

Supplies:
CC Products:
Box from CC order
White cardstock by Carte Bella
Kraft cardstock by Carte Bella
Distress inks-Black Soot, Mustard Seed, Peeled Paint, 
Broken China, Worn Lipstick and Walnut Stain
Snake Tape
NonCC: dictionary (photocopied onto white cardstock); 
"Dwelling" and "Nature" by Studio Creative Layers Stamps (clear & foam); 
"Dark Taupe" chalk ink by Colorbox; and pop-up Glue Dots

I thought it turned out pretty cute.  What do you think?  Though this isn't a very big wall hanging, I think I'm going to put it up in my living room . . . well, actually on the post between my living room and dining room.

Till the next time I'm up in the night.  Kathy

Saturday, November 3, 2012

Fall Wallhanging - Challenge #37

This past week on CropChocolate, our weekly challenge (Challenge #37) was to "add texture to your project is a quick and easy way to create dimension and interest . . . . by using an unusual and/or uncommon material, such as corrugated cardboard, burlap, pasty substances, or any other kind of 'rough' material."  How FUN!!!

So using Nina N's October Design Team project for inspiration, I went to work.  Here's what I came up with:


Supplies
CC Products:
"Lovely Noteables" Times and Seasons by Echo Park (green #1)
"Sweet Stripes" Times and Seasons by Echo Park (green #2)
"Happy Thoughts" Beautiful Moments by Carte Bella (yellow #1)
"Tiki Masks" Surf and Swim by Trinity (yellow #2)
"Borders" Surf and Swim by Trinity (orange)
Note to Self by Echo Park (brown)
St. Nick by Fancy Pants (red)
Summer's End ribbon by Fancy Pants
Walnut Stain distress ink
box from CC order
Snake Tape
NonCC: misc. green ribbon; script stamp; Tim Holtz "Autumn Gatherings" die; and Gesso

I think it turned out pretty good . . . though it could use a littl more of "something".  What do you think?  Anyway, right now, I have it hanging in my Dining Room.  It matches the colors of my home really well. 

Till the next time I'm up in the night.  Kathy

Wednesday, October 24, 2012

"Secret" Surprise Mini Album

One of my favorite candies are the boxes of chocolates with fillings . . . you know, the ones you don’t know what it is until you take a bite out of one or poke your finger in the bottom. Not only do I love the chocolate, but I love the “surprise” in the middle. So for my October Design Team project this month on CropChocolate, I decided to do a “Secret Surprise Mini Album” . . . it’s called a “Secret Surprise” because it’s “filling” (it’s pages) are made of a “secret” ingredient . . . toilet paper rolls!! J And because each page has a “surprise” in the middle of it . . . an extra tag for more pictures or journaling. 

On the 1st "Secret" Surprise mini album I did, I used eyelets and binder rings to hold it together. While it worked, I wanted something different. Then one day I was in my LSS and saw a mini album that looked like a hardback book. I talked to one of my friends who works there and mentioned to her what I was doing and how I wanted it to look. Before I knew it she had copied some instructions on how to do that hardback cover. So I give credit for the cover to my LSS.

Here's what the final project looked like:


To see it in more detail and instructions, click on this IG link.


Till the next time I'm up in the night.  Kathy
Tuesday, October 23, 2012

Pinterest Inspired

Have you ever been to Pinterest?  It is a GREAT place to get inspired or to find ideas, recipes, etc.  And if you haven't, you should.  But be careful, it is VERY addicting. :)

Well, this month for CropChocolate's Focus Group, our assignment was to be "Pinterest Inspired".  So after much debating, I fell in love with a layout using Mischievous by My Mind's Eye.  I knew it would be the perfect layout for some pictures I took of my daughter and nieces & nephew.  Here's the "pin" and what I did:

Supplies

CC Products:
Mischievous paper collection by MME
Mischievous 6x6 paper pad
Amy Tangerine Sketch Journal Collection (used the Thickers included)
Jovial brads by BG
Lush 2 rhinestones (orange)
black/white twine
Season's Greetings brads by EP
buttons by FP (not sure which line since I put all my buttons in 
one jar and I have bought all my buttons from CC)
Walnut Stain distress ink
and Snake Tape. 
NonCC: Heidi Swap Memory File rub-ons; Kaiser Kraft tine type (toffee apple); 
and Glimmer Mists (I mixed "Burnt Red" and "Kandy Korn" to get a burnt orange.


This picture looks a bit dark ...not sure why since I used reg light and my Ott lite - it is brighter IRL.   So what do you think?

Till the next time I'm up in the night.  Kathy

Monday, October 22, 2012

Secret Surprise Mini Album

For October, our Design Team then was "Favorite Candy".  One of my favorite candies are the boxes of chocolates with fillings . . . you know, the ones you don’t know what it is until you take a bite out of one or poke your finger in the bottom.  Not only do I love the chocolate, but I love the “surprise” in the middle.  So for my project this month, I decided to do a “Secret Surprise Mini Album”  . . . it’s called a “Secret Surprise” because it’s “filling” (it’s pages) are made of a “secret” ingredient . . . toilet paper rolls!! J And because each page has a “surprise” in the middle of it . . . an extra tag for more pictures or journaling.  (You will see in my final pictures of my project that there are no pictures in this album . . . that is because I’m going to using this for the Mini Album Swap.)

On the 1st "Secret" Surprise mini album I did, I used eyelets and binder rings to hold it together.  While it worked, I wanted something different.  Thne one day I was in my LSS and saw a mini album that looked like a hardback book. I talked to one of my friends who works there and mentioned to her what I was doing and how I wanted it to look.  Before I knew it she had copied some instructions on how to do that hardback cover.  So I give credit for the cover to my LSS.

So today on The Crop, my "Secret Surprise Mini Album" is up  Here's a sneak peek . . .


To find out more on how to make this album and / or to see it in more detail, go to The Crop on CropChocolate.com.  And while you are there, stop by the past deal page to see what's has been up and you can still get. :)

Till the next time I'm up in the night.  Kathy 

Tuesday, October 16, 2012

Challenge 34a and 34b

Once again, Crop Chocolate decided to do a twist this week for the weekly challenges.  Instead of one, there were two challenges.

The first challenges  was to make my favorite dessert and post the recipe step-by-step using pictures and words on Instructagram.com and on the CropChocolate.com contest page.  We were to list the product used and a URL where to buy at least one of the items used (Kitchenaid, cookie sheet, etc.) to make it.  Then share on FB or Pin it on Pinterest.

I decided to make a favorite of my daughter's "Nutella Dessert Crescents".  Very simple and very delicious.  Here's the link to the IG to get the instructions:  http://www.instructagram.com/igrams?cat=71#iGram  Here's a picture of what it turned out like:


If you can't get the link to work to go to IG, please post a comment in the replies and I'll get the recipe posted in another post.  Thanks!

The second challenge was to use on the cards from the CC OWH Blog Hop and create another card.  Then post it both on IG and on CC's contest page.  Here's what I came up with:

Supplies
CC products: 
Designer Cardstock - white by Carte Bella
Black Soot distress ink
black/white twine
snake tape
Copic marker
black button from "Oct 31" by Fancy Pants
NonCC: Spica pens (pitch black, gold, pink, clear)

I did a card similar for the OWH blog hop, but used gold and red for Cyclone colors.  Here I used Iowa Hawkeye colors. :)  I'm pretty happy with how it turned out.  It was so simple, but make a nice card.

Till the next time I'm up in the night.  Kathy

Challenge 33

Last week's challenge on Crop Chocolate came with a twist.  Yes, there still was a crafty element to the challenge, but it was also a contest for $100 Crop Credit and a chance to try something new the owners have in development.

For the challenge, we were to create a project (card, layout, altered item, etc.) using a patterned paper with text and a metal embellishment.  Then came the twist . . . we were to (1) create an account on Instructagram.com; (2) take step-by-step pictures of the project and upload to IG; (3) share on FB, pin on Pinterest, etc.; and (4) answer a couple questions regarding IG.

Oh, and we were able to enter more than once!!!  Boy, I don't know anyone who could NOT use $100  in Crop Credits.   So to work I went . . .

My 1st project is a Christmas Wreath made from 3D stars.  Here's how it turned out:

Supplies:
CC Product
Very Merry Christmas paper collection by Echo Park
Christmas This & That paper by Echo Park (multi-colored dots)
Doodlebug Christmas buttons
Making Memories "Noel" brads & metal stars
Cameo
NonCC: chipboard; hot glue gun; misc. ribbon

Since I still had a bit of time, I decided to do a 2nd project . . . I wanted all the chances I could at that $100 Crop Credit. :)  So I decided to recreate a tag that I did years ago in a make 'n take.  Here's how it turned out:

Supplies:
CC Products
Walnut Stain & Fired Brick distress ink
Stickles
MM mini staples
twine from Jillibean
Snake Tape
Cameo
NonCC: tag; TH Christmas stamp; Star pin; misc. Christmas paper (I know I got from CC, but it was scraps so I had no name for it); and misc. ribbon

So what do you think?  I thought they turned out pretty good.  Too bad I didn't win the $100 Crop Credit . . . BUT I had a lot of fun creating and uploading my projects to Instructagram.com.

Till the next time I'm up in the night.  Kathy

Wednesday, October 10, 2012

Winners, Winners, Winners . . .

for the past 10 days or so, the Crop Chocolate Design Team hosted an OWH blog hop . . . to encourage others to make cards for our deployed "HEROES".  The response was overwhelming and the cards . . . well, the cards were just outstanding.  So a big "THANK YOU"  to everyone who took time to participate . . . our "HEROES"  will appreciate the efforts of each and every one of you. :)

Now onto the winners of my blog candy and the $20 Crop Credit . . .

{{drum roll}} . . .

The winner of the 1st thing of blog candy is . . .


JeepMama . . . you can see her wonderful creations here.


The winner of the 2nd thing of blog candy is . . .


NinaN . . . you can see her amazing cards here.


And the winner for the $20 Crop Credit for making the most cards is . . .


BethD488 . . . you can see all 76 cards she made here.


Congrats to each of you!!!  Please PM on Crop Chocolate with your name and mailing addy so I can get your goodies in the mail. And Beth, please PM with your email addy so I can get your Crop Credits ordered.

Again, thank you to each and every one of you who participated in such a worthy cause.  And, remember, just because there isn't a blog hop going on, doesn't mean that you can't still make cards for OWH . . . they take any type of cards throughout the year.  For more information, click here.

Till the next time I'm up in the night.  Kathy

Monday, October 8, 2012

OWH Blog Hop Challengs

Even though I've been busy helping my daughter get her Halloween costume sewn, I've also been busy getting some cards done for the OWH blog hop that CropChocolate's Design Team has been hosting from Sept. 28 to Oct. 8.  With the exception for the Christmas cards I made from "Festive" by Authentique for Brenna's and Jenni's Challenges (actually, it was same one I did for my own challenge, but I made several more to enter in their challenges) and for the basic white cardstock I used for Christina's challenge, all of my cards were made with leftovers from "The Good Life" by Echo Park.    I did this since there were two challenges that wanted us to use up one collection or one collections scraps . . . might as well be efficient, right?  It made it easy to mix and match the colors and patterns, plus make several of the same card while changing sentiments.   Here's what I came up with:


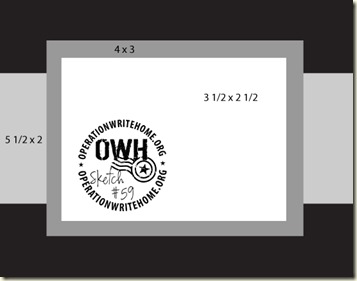
Amber's Challenge was to use this sketch:


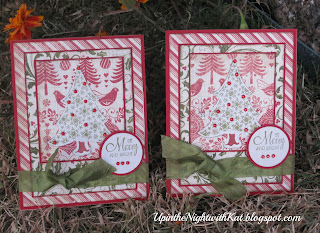
Here's what I came up with:


Michelle's challenge was to use this sketch:

Print

Here's what I came up with:


I ended up doing several of this card, but changed the sentiment. I only show 2 of the 4 I did.

Brenna's challenge was to " make subtly dimensional cards that are visually and tactile-y interesting, without being lumpy or difficult to ship".  Since one of the cards I made for my own challenge fit these requirements, I  went ahead and made a couple more.  Here's what they look like:


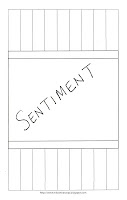
Julies challenge was to use the following sketch that she came up with:


Here's what I came up with:


For both Brittany and Nina's challenges, we were to either use up scraps from one collection or use up an old or new collection.  Since I had just made two cards from "The Good Life" by Echo Park and had plenty of scraps left from it, I decided to continue to use this collection for as many of the challenges as I could so I could complete both Brittany and Nina's challenges.  I ended up with 1 sheet of paper and a handful of little pieces (less than 2"x 12") left.  Here's what I came up with:


Miwa's challenge was to use one of the sketches she came up with:  Here's the two I decided to try:

Here's what I came up with:


Jenni's challenge was to use a paper punch and a stamp.  Once again, one of the cards I did for my own challenge would work with this along with a card I did for another challenge.  Here's what I came up with:


Christina's challenge was to make a card with an unusual fold.  I liked the card Christina did, so I scraplifted it,, but used different stamps.  I ended up doing a total of 11 for this challenge.  Here's what I came up with:


Thanks so much for coming back to check out what I did.  I'm so excited that I now have a total of 74 cards  to send off to OWH . . . that is from OWH Virtual Card Party and from this CC's OWH Blog Hop.  I didn't show all the cards I made, but tried to show the best ones I could get in the pictures. :)

Till the next time I'm up in the night.  Kathy


Thursday, September 27, 2012

CropChocolate's OWH Blog Hop

Welcome to CropChocolate's "OWH" blog hop hosted by the current Design Team.  You should have arrived here from Miwa's blog. If you stumbled across this blog hop, please feel free to go back to the beginning to Amber's blog to join us.  The blog hop will run from 8am MST September 28 to 8am MST October 8 so you will have lots of time to get some cards done. 

What is OWH, you ask?  OWH is short for Operation Write Home and they are an organization whose mission is "to collect handcrafted greeting cards for our deployed heroes to write home on".   So we decided to host a blog hop to encourage everyone to make and donate cards.  Here is the website with all of the information and requirements for making the cards  www.operationwritehome.org .  There is lots of requirements, so please read carefully. 

FYI - Canadian participants can follow the OWH rules, too.  Some of our DT members are from Canada and we found a place to send cards to for the Canadian Armed Forces.  Feel free to contribute to both.   

Here's the info for the CANADIAN GIRLS:  
Corinne Brauun
6-300-108th Street
Sakatoona, SK S7N 1P8


Okay, on to the other stuff about our OWH blog hop.  Each individual blog will have a challenge for you to do to complete a card or cards. There will be a main prize from CropChocolate and some of the individual blog owners will also be giving away their own blog candy.  So please make sure to follow instructions carefully on each blog.  All cards to be linked need to be 50% CC products.  Once you get to the end, please make sure you have linked up each of your cards to the respective challenge/blog by using the Mr. Linky link that is provided for that individual challenge.   I will be giving away some of my own blog candy . . . actually three (3).  I will be drawing one name from those who do my 1st challenge and drawing another name from those who do both challenges and then another who posts the MOST cards/challenges for the blog hop. :)  (More info to follow).

I think that's all the important stuff . . .

This past month I've been going to a lot of weddings and my anniversary is coming up . . . so I decided to do a wedding themed challenge.  I came up with 2 challenges, but you only need to do the first one to be eligible for the main prize. 

My 1st challenge to you is to create a card by using "something old, something new, something borrowed & something blue".  Here's what I did:


Supplies:
CC Product
"The Good Life" collection pack by Fancy Pants
"The Good Life" brads by Fancy Pants
blue/gray cardstock (WinterPark solids) by Echo Park
Walnut Stain distress ink
OMC Craft Tape

My "something old" was a tool - my magnetic brad setter; my "something new" is "The Good Life"  collection pack by Fancy Pants; my "something borrowed" is the color combination (I got inspiration online); and my "something blue" is the blue/gray cardstock.  I like this paper collection by Fancy Pants so much that I'm now "stalking" the swaps section so I can get one or two more. :)

My challenge to you is to use "2 colors (black & white not eligible) and some bling".  (If you do this 2nd challenge, you will be entered into another drawing for some special blog candy.)  Here's what I came up with:

Supplies
CC Product
"Festive" paper collection by Authentique
red/cream cardstock by Echo Park
red rhinestone by Scrappin Lot
Fired Brick distress ink
Peeled Paint distress ink
Walnut Stain distress ink
OMC craft tape
Cameo

NonCC:  Misc. ribbon

Now for other blog candy I was talking about earlier.  To be eligible, please become a follower (if you aren't already) and leave a comment that you've done so or anything you would like to say . . . but please keep it clean.   All cards to be linked need to be 50% CC products. Also, please link up your cards with the Mr. Linky link that is at the end of this post.   You need to link up and use 50% CC products not only to be eligible for my blog candy, but also for the main CC prize.  As I said earlier, I will draw 1 name from those who do my 1st challenge and another name from those who also do the 2nd challenge (a goodie bag) and then for the one who makes & posts the most cards ($20 CropCredit from me).  NOTE:  I would prefer them to be all different . . . but if you do make duplicate cards, you will need to post a picture of all of them to have all of them count towards the CropCredit prize.  I will announce my winners on October 10 at 8am MST.

Thanks so much for joining us.  So now that you are done here, you can hop on over to Jenni's blog.  Following is a list of the blogs participating in this blog hop in case you get lost.


Challenge #32 - Easel card

This week for CropChocolate's weekly challenge, we were to do an easel card . . . didn't matter if it was a basic, twisted, double, triple, etc.  Along with that we were to use 2 patterned papers, a stamp (sentiment okay) and any bling we wanted.

After much debate, I decided to go with a basic easel card.  I ended up using the same layout I did for an OWH card, but put it on an easel base and embellished the inside.  Here's how it turned out:

Supplies:

CC Products
"The Good Life" collection pack by Fancy Pants
"The Good Life" brads by Fancy Pants
"blue/gray" cardstock (Winter Park) by Echo Park
Walnut Stain distress ink
OMC craft tape

NonCC: flowers w/ leaves by Prima

I ended up using a pre-stamped sentiment that was included in "The Good Life" collection pack and I used the colored brads as my bling.  I am really happy with how it turned out for my first time making an easel card.  What do you think?  Next I'd like to try a twisted easel or maybe even a twisted quad . . . they look so cool. :)

Till the next time I'm up in the night.  Kathy

Fudge Lover's Cream Cheese Cake

The other day I decided to do some baking and was having a craving for chocolate.  So I decided to make a "fudge Lover's Cream Cheese Cake" that I had when I was at a scrapbooking retreat in St. Louis . . . it is chocolate, upon chocolate, upon chocolate with fudge frosting.  Is your mouth watering yet?

Anyway, a few of my fellow CCers from CropChocolate requested the recipe and also requested I post it on my blog so they could pin it.  So here I am typing away . . .

Fudge Lover's Cream Cheese Cake


Cake:
1 box Betty Crocker SuperMoist devel's food cake mix
1 box (4-serv size) chocolate instant pudding mix
3/4 cup hot water
3/4 cup vegetable oil
1 teaspoon vanilla
4 eggs

Filling:
1 package (8 oz) cream cheese, softened
1/2 cup sugar
1 egg
1/2 cup semisweet chocolate chips
1/2 cup chopped nuts (optional)

Frosting:
1 container Betty Crocker Rich & Creamy chocolate frosting

Preheat oven to 350 degrees (325 for dark or nonstick pan).  Spray bottom only of a 13x9-inch pan with baking spray with flour.

In large gowl, beat cake ingredients with electric mixer on low speed for 30 seconds then on medium speed for 2 more minutes; scrapping bowl occasionally.  Pour into pan.

In large bowl, beat cream cheese, sugar and 1 egg with electric miser on medium speed until smooth and creamy.  stir in chocolate chips.  Spoon filling by tablespoonfuls evenly over op of batter.  Using table knife, swirl filling through batter.  Sprinkle with nuts.

Bake 47 to 55 mintes or until toothpick inserted in center comes out clean.  Cool completely, about 1 hour.  Spread frosting over cooled cake.  Store covered in refrigerator.


Pretty easy, don't you think?  If you don't want so much chocolate, you can also use a Betty Crocker SuperMoist Yellow cake mix and/or Betty Crocker Rich & Creamy vanilla frosting.

Till the next time I'm up in the Night.  Kathy

Friday, September 21, 2012

"I do" . . . September Focus Group Project

For the month of September, our challenge for the CropChocolate FG was to be "Family Tree" inspired.  Well, after much debating and some begging from a certain person, I decided to do another layout of my mom & dad's wedding.  Here's how it looked:


Supplies:
CC products
"Sunshine" from A Walk in the Park by Echo Park
Orange from Summer's End by Fancy Pants
red/cream cardstock by Echo Park
chocolate/tan cardstock by Echo Park (misted with Tattered Leather glimmer mist)
orange & red buttons (not sure what line but I've gotten all my buttons from CC)
crocheted ribbon by MME (was cream & I used Tattered Leather GM to color it)
twine by Jillibean
paper flowers by bazzillbasicspaper (leaves)j
Making Memories puffy alpha
Walnut Stain distress ink
Snake Tape

NonCC:  Walnut Stain Stickles; Double Loop "Around the edge" paper punch by Martha Stewart; flowers by Petaloo; Circle Doily stamp by Hero Arts; Gesso, corrugated cardboard; orange ribbon; "Tattered Leather" glimmer mist; branch with leaves from UmWowStudio (used TA glimmer mist on it too); and misc. heart charm


I got inspiration for this online but there was no name to give credit to. I chose the colors because they remind me of Fall and my parents were married in the Fall.  Now I have 2 layouts of my parents' wedding picture and I don't want to give either of them away.  The other one was my 1st CropChocolate DT project and this one . .  well, I really liked how it turned out.  What do you think???


Till the next time I'm up in the night.  Kathy
Monday, September 17, 2012

Challenge #30

This past week on CropChocolate, we had another GREAT challenge. Since the September theme for the Design Team is 3D. we were to  "Create your own 3D element (ie shaker box or something like that. Flowers do not count!) for a project, or think bigger and create a whole 3D project. The sky is the limit with this challenge!" for Challenge #30.

After some thought, I decided to work on some pumpkins for my fall decorating . . . I make these every year.  Here's what they look like:


Closeup of 1st pumpkin

Closeup of 2nd pumpkin

Supplies
CC Products: 
Mischievious by MME
Walnut Stain distress ink
Snake Tape
OMC craft tape

NonCC: misc. ribbon and paper wire; and 3" scalloped circle punch

As I stated earlier, I've made these little pumpkins every year for Fall/Halloween decorations. I used a 3" scalloped circle punch and punched 12 circles; folded in half and adhered together to make ball. Then embellish as desired.  It's pretty quick and easy. :)  (If you would like instructions with pictures, make a comment and I'll put some together.  Thanks!!!)

Till the next time I'm up in the night.  Kathy


Challenge #29

Each week on CropChocolate, they have a weekly challenge.  It is so much fun and not only are you entered into a drawing for $10 CropCredit for the week, you are also entered into a monthly drawing for $25 CropCredit.

For Challenge #29, we were to create a project and use only 1 color. Black and white do not count towards your color count. :)  Well, over Labor Day weekend, I did some cards for Operation Write Home's Virtual Card Party.  It was 10 different challenges, and even though I got 35 or 38 cards done, I only got 5 challenges done. :)  Since I had done a card in monochromatic theme, I decided to enter it in for this challenge also.  Here's what I did:


Supplies
CC Products:
Lush2 Navy cardstock collection by MME
Faded Jeans distress ink
Snake Tape

NonCC: Misc. stamp (doesn't say manufacturer on the block)

I also did the same card in Lush2 black and Lush2 green.  I was so excited to get so many cards done for our "heros".  

One more thing . . . I want to invite everyone back on Sept. 28 at 8am to Oct. 1st 8am MST for another OWH Card Blog Hop hosted by CropChocolate's Design Team.  We will be making cards for OWH and giving challenges to those who want to participate.  There will be prizes given by CropChocolate in addition to individual blogs giving away some blog candy of their own to those who participate.  So stop on back . . . the hop will be from Sept. 28 8am MST to Oct. 1 8am MST.  Hope to see you hopping. :)

Till the next time I'm up in the night.  Kathy

Challenge #28

As I stated in my previous posting, I noticed that my postings for the last 5 CropChocolate challenges did not post . . . I had them scheduled but for some reason they didn't post?  Whatever the reason, I'm going to rectify that tonight by revising and combining a couple of them so there's not so many at once.  And then  publishing them ASAP.  :)

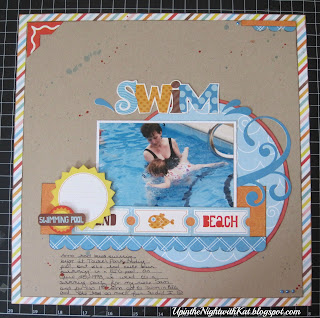
For Challenge #28, we were to "Create a project that "Celebrates Summer" with an added requirement of including water. Water can be added however they want - in a photo, a stamp, a wave border, rain, etc!!"  When I saw the word "water" along with "Celebrates Summer", I knew I wanted to do a layout of my daughter swimming.  But I was stumped even though I have lots o summer/water pictures of my daughter.  . . . for almost a week, nothing came until late last night (8/28) when I was looking thru an old scrapbook.  Some of you may remember me mentioning that I'm "redoing" some of my old layouts . . . well, not really "redoing" as to actually just doing again because I'm keeping my old layouts.  They show how I have grown as a scrapbooker . . . it's part of my creative history.  With that being said, I knew I wanted to do this layout (again) of the 1st time my daughter went swimming.   Here's what I came up with:


Supplies 
CC Products
"Splash" paper collection by Echo Park
"Paradise Beach" cardstock by Echo Park (red)
"Baby Blue" Liquid Pearls
Walnut Stain distress ink
Snake Tape
Cameo

NonCC: Glimmer Mists in "Atlantic" and "Marmalade"

I love using tan or Kraft cardstock with bright colored patterned paper.  I think it enhances the paper especially when I "flick" mists onto the paper as I did here with my glimmer mists in "Atlantic" and "Marmalade". 

Well,, what do you think?  I'm pretty please with it . . . enough that I've scrapped some of the other pictures that were taken this same day.

Till the next time I'm up in the night. Kathy