CLICK HERE FOR FREE BLOGGER TEMPLATES, LINK BUTTONS AND MORE! »

Tuesday, December 31, 2013

Mid-Challenge Inspiration - Warm/Fuzzy

Hi, all my crafty friends and family!!!  

Is everyone rested up from Christmas and getting ready to ring in the New Year?  I know I am . . . well, almost.  I still need to get my ingredients for our "New Recipe" day we do on New Year's Day . . . usually, we have friends and family over to try out "new" recipes and it is always so much fun.  This year, though, it may just be me and my family since my hubby has to go to work the very next day . . . but we will still have fun trying out a couple new recipes I have found. 

Anyway, I am here today to to remind you that you still have one (1) week to complete a project for Clear It Out Challenge.  The theme is "Warm / Fuzzy" and the stash item is something textured.  Here's a little card I put together for just for this challenge:

Supplies:
"Very Merry Christmas" paper collection by Echo Park
X-Press It paper (made to be used with Copics and other alcohol-based markers)
Copics: YG63, YG67
Stickles - Xmas Red & Diamond
"Holly Jolly" mini jewels by TPC Studios
Helmar Scrap Dots (3-dimensional adhesive)

When I saw this digi image, "Cup 'O Heart Chocolate" by Digi Darla Designs, it reminded me of a mug I had in my cupboard . . . and how whenever I used it, it made me feel "warm & fuzzy" all over.  So I decided I had to use it for this challenge.  I used Stickles for my texture . . . if you look, you will see that the dots and marshmallows are raised up a bit.  That is because I applied my Stickles twice to achieve the effect I wanted . . . plus, it would match my own mug. :)  (Note: I did try to apply a large amount of Stickles at once, but it warped my paper a bit . . . not a lot, but enough that I wanted to try to do it another way before going on with my card.) I also used Stickles for the heart above the mug.

Another thing I did was use the label "Very Merry Christmas" from the bottom of my papers as my title . . . you know, the piece you always cut off to get your paper 12x12?  I matted it first, then used Scrap Dots for more dimension.  I also used Scrap Dots on my middle banner to help show the layers.

And "Voila!" I was done.  It was a pretty easy card to put together.  Now remember that you still have one (1) week to get your project posted to Clear It Out Challenge.  I can't wait to see what you come up with as one of your final projects of the year . . . I can hardly believe that 2014 is right upon us.

Have a Happy New Year, my dear friends!!!

Till the next time I'm up in the night.  Kathy


PS  For those who emailed, the figures behind my card are my Jim Shore Santa figurines . . . I love Jim Shore because of the folk artsy/quilty look to them.  This is the first year in over 10 years that I didn't get any of the new releases for the Santa, Nativity Scene or Snowman.

Saturday, December 28, 2013

HIMCR #130 - Anything BUT Christmas

Hi, all my crafty friends and family!!!

I hope and pray everyone had a VERY Merry Christmas this past week . . . and are now getting ready to ring the new year!!!  

Here it is Saturday once again and do you know what that means?  Well, since it is the weekend after Christmas, it means that most of you are either getting geared up or resting from a day or two of "After Christmas" shopping. It also means it is time for another AMAZING challenge at Hiding In My Craft Room.  Usually, it is time for "Freestyle" week, but since so many of us are so done, done, done with making Christmas cards, Christmas candies, Christmas cookies, Christmas shopping, etc.,  this week's theme is "Anything BUT Christmas".  

And I am here to encourage all of you to put away your car keys and wallets . . . and get out your scissors, paper and adhesive so you can join us for this fun challenge. Remember, you have one week to submit your projects on HIMCR to be eligible for the weekly prize. 

Originally, I was working on a layout to share today.  But due to the busyness of the holiday, I decided to share a birthday card I made.  I did one similar back in June ("Polka or Not to Polka"), but since I liked the colors and sketch so much along the stamp that I used, I had to make it again.  Here's how it turned out:

Supplies:
Red cardstock
"Trend Setter" paper collection by Fancy Pants
"Aquaduct" Core'dinations cardstock
"Birthday Blueprint" stamps by Tim Holtz
"Quote" stamps by Tim Holtz
Twinkling H2Os - African Jade and Deep Coral 
" Rouge" Liquid Pearls
"Caribbean" twine from The Twinery
Gems & Pearls from Vintage Findings by Teresa Collins
misc. button

Usually, I just use a small brush when using my Twinkling H2Os . . . but this time, I also used  a "detail" watercolor brush in the smaller areas.  It helped me so much with the small detail areas and kept my "painting" from looking like a kindergartner . . . it helped me stay in the lines.  As I mentioned before in another post, I usually spray my Twinkling H2Os 3x with water and let it set for a few minutes to "activate".  If you don't do this, your color will be watery . . . not very vibrant.  

So once again, I am happy with my "make it again" project . . . is there a project you have made again and again?

Till the next time I'm up in the night.  Kathy

Thursday, December 26, 2013

Get Inky! Challenge #20 - Winter/Snow


Hi, to all my crafty friends and family!!!

Did everyone have a good holiday?  I know I did . . . it was full of family, friends, and FOOD! (Well, and a little crafting on the side for me. lol)  It is always so fun to get together and give thanks for the reason for this season . . . and to reflect back on the "good ole days".  (Makes me sound old, doesn't it? lol)

Anyway, over at Get Inky! Challenge blog, they are having a new challenge and the theme is "Winter/Snow" . . . so easy, peasy!  Well, when I think of winter, I think of Christmas, Christmas carols, evergreens, and such.  So when I received this digi "Color Merry Christmas Tree", I knew I needed to use it as my challenge inspiration.  (Get Inky! stamps has some GREAT digi images, so make sure you check them out.)

Here's how my card turned out:


As some of you might recognize, I came up with this same sketch and used this paper a couple weeks ago for Super Scraps Saturday for Hiding In My Craft Room . . . but what can I say?  When you find or do something good, you keep it. :) (But I did add a few different items to it to work with my digi image.) 

For this card, I used "Very Merry Christmas" paper collection from Echo Park. I also used ribbon from Snug Hug; red bling from  "Holly Jolly" mini jewels by TPC Studio; and "Vintage Finds" gems and pearls by Teresa Collins . . . and Voila! it was done.  

Now it's your turn to come up with a project and get it entered in this week's challenge over at Get Inky! challenge . . . I truly hope to see you there!!!

Well, it's time to have a Midnight snack . . . I wonder if there's any leftovers left?  I sure hope so. :)

Again, I hope you all had a VERY Merry Christmas (and have a Happy New Year)!!! 

Till the next time I'm up in the night.  Kathy


Saturday, December 21, 2013

HIMCR #129 - CASE Yourself!

Hi, all my crafty friends and family!!!  

Here it is the 3rd Saturday of the month . . . 
and do you know what that means?  

Well for one, it means, we have only 4 days left till Christmas.  But it also means it is time for another AMAZING challenge at Hiding In My Craft Room.  And I am here to encourage all of you to put Christmas wrapping and get your crafty space cleared off so you can join us for this fun challenge. Remember, you have one week to submit your projects on HIMCR to be eligible for a Close to My Heart Stamp set from Carrie.  Hmmm, pretty nice prize . . . too bad I'm not eligible.  :)

Anyway, the theme this week is CASE Yourself! . . . meaning "Copy and Share Everything".  Basically, pick something you have done before and do it again by either revamping or redoing it, adding to it or just making it again because you really liked it and want another.

Well, for this challenge, I took a card that I did towards the beginning of November (click HERE to see original post) and have had on my crafty table since then because I just did not feel like it was "done" . . . that it still needed "something".  So when I saw what this week's challenge was going to be, I knew I had the PERFECT opportunity and project for it.  So Here's my card in it's "BEFORE" state:

BEFORE

Here's how it turned out after I changed or added a few things to it:

AFTER

As you can see, the "BEFORE" card is okay . . . but the "AFTER" card is much, much better.  What I did make it better was adding the words "Peace", "Joy", "Love", & "Noel" from Get Inky! 2013 Holiday stamp set around my digi image along with the "Merry Christmas" sentiment from the same stamp set from Get Inky!.  I also used small red glitter gems from Close To My Heart by placing them to the top and bottom of my card and larger ones to each side.  And "Voila!" . . . I was finally happy with it.

Now it is your turn to "CASE" something and turn it in to HIMCR in the next week.  I can hardly wait to see what you do.

Have a VERY Merry Christmas!!!!

Till the next time I'm up in the Night.  Kathy


Tuesday, December 17, 2013

Clear It Out Challenge - Warm Fuzzies


Does anyone know what time it is?

That's right . . . 

It's CHALLENGE time!!! 


Hi, all my crafty friends and family!!! Can you believe that Christmas is just around the corner? Less than 8 days to go, I think?  And are you finished with your holiday crafting, baking and shopping?  Well, even if you aren't, that is okay because once again, it's challenge time over at Clear It Out Challenge.  Time to clear away the shopping lists, clear away any remaining baking "stuff" (well, except for a few cookies/candies to help you keep focused--lol), and clear away anything else that is stockpiled in your crafty space . . . and let's get our crafty on!!!  And usual, our most G-E-N-E-R-O-U-S leader, Laura,  has come up with another amazing challenge for us . . .and it's so easy, peasy!!!  So get out your paper, scissors, glue  and . . . 

 Are you ready???

I didn't hear you . . . 


Are you ready???

Okay, it's challenge time!!!

Theme: Warm Fuzzies
Stash: Something textured

You have 3 weeks to play (till Jan. 6th)

Our sponsors this challenge are:

 
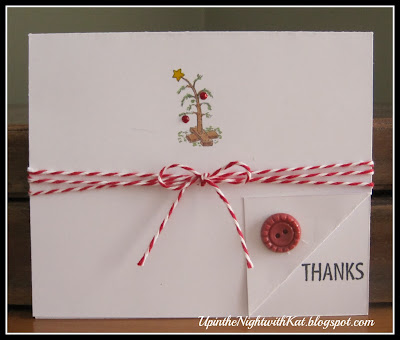
When I saw "The Perfect Christmas Tree" by QKR Stampede, it reminded me of a Charlie Brown Christmas and how beauty is in the eye of the beholder . . . old cartoons like that make me feel all warm and fuzzy inside. And with it being so close to Christmas (less than 8 days away), I decided to show you once again this quick and simple card using "The Perfect Christmas Tree" digi image . . . as I have mentioned in other blog posts, it is a style I have done many times before and I never get tired of it. And I decided to get a headstart on my "Thank You" cards for after Christmas. Here's how it turned out:


One thing though, this is the first time I used a digi image on this style.  So while this card is a simple and quick one, you do need to take a few minutes to figure out the placing of where you are going to print your image.  How I did it for mine was take a 8-1/2"x11" piece of cardstock and made a pencil mark at the halfway point (vertical), so it would look I would have two (2) 4.25"x11" pieces at the end. Then I measured down 5.5" (to where the fold of the card would end up), then measured another 1/2" or so to where top of the image would be . . . BUT this will all depend on how big YOU decide YOUR image will be. With these numbers, I went into my Word doc and made the necessary adjustments to the margins and using the little ruler at the top and side, I inserted my image (which I changed its size to 1.25") approximately 6" down from top and in approximately 2,25" from side. BUT this all depends on how big you want your image.  If you are unsure if you got it in the correct place, then print it on plain white paper first to see if you need to adjust your measurements . . . that is what I did.  I was able to print two (2) images/cards.

Once I had it printed, I colored with my Copics, added some Stickles, some green Flowersoft Flock and Smooch Pearlized Ink.  Then add some twine from The Twinery and the "THANKS" sentiment is from Close to My Heart.  Then last, but not least, added a miscellaneous red button on the folded corner.  Voila! It was done!!!

As you can seen before, this style of card not only would work GREAT for regular clear or red rubber stamps, but it also works GREAT with digi stamps.  So now that you have an idea for a quick and simple card, I hope you enjoy making it as much as I do . . . as you can see, I've already done three (3) different ones this past month or so.  I just love it and how you can get different looks.

Have a Very Merry Christmas!!!

Till the next time I'm up in the night.  Kathy

Monday, December 16, 2013

Get Inky - Challenge #19 Christmas

Hi, all my crafty friends and family!!

Are you ready for Christmas yet?  I know I'm not quite there . . . but that is okay because I still have 10 days, right?

Well, right now, Get Inky! Stamps has a super fun challenge going on over at Get Inky! Challenge and I am here to give you some inspiration.  With it being so close to Christmas (less than 10 days away), I decided to show you a quick and simple card . . . it is a style I have done many times before and I never get tired of it. And with how versatile Get Inky! stamps are, I can get so many different looks. Here's what I came up with:


For this card, I used two (2) stamps from Get Inky! Stamps' 2013 Holiday stamp collection.  For the tree, I used my Copics (YG63, YG67, E43, E47) to color it and Xmas Red Stickles for a little decoration . . . I also used a sequin at the top of the tree.  The twine is from The Twinery.  And to finish off the card, I used a red button from my stash. Voila! It was done!

Thanks so much for stopping by today, especially when I know so many of you are busy with last minute preparations for Christmas.  And, just maybe this card might help you with a few last minute cards?

Have a Very Merry Christmas!!

Till the next time I'm up in the night.  Kathy


Saturday, December 14, 2013

HIMCR #128 - Super Scraps Saturday

Hi, all my crafty friends and family!!!  

Here it is the 2nd Saturday of the month . . . 
and do you know what that means?  

It means it is time the Super Scraps Saturday challenge at Hiding In My Craft Room.  And I am here to encourage all of you to put Christmas baking and get out your scraps so you can join us for this super uber fun challenge. Remember, you have one week to submit your projects on HIMCR to be eligible for 3 digital stamps from our amazing sponsor, Sweet 'n Sassy Stamps.  (I just realized something . . . it's SSS at HIMCR and our sponsor is SSS. Hmmm.....)

Anway, Sweet 'n Sassy Stamps gave us some AMAZING digital images to play with this week.  I will admit that the following card is not the one I started out with . . . and that is because as I was typing up my blog post and trying to list what products and paper I used, I realized that some of my scraps were digi paper (and not from Sweet 'n Sassy---Oops!)  So back to the drawing board . . . and here's what I came up with:  


For this card, I chose "Cocoa's Christmas Tree" digital stamp from Sweet 'n Sassy Stamps . . . isn't he so adorable?  You can even get this same image as a clear stamp in "Cocoa Christmas" clear stamp set (comes with 2 images and 6 sentiments).  Isn't that GREAT!?!?

Anyway, at first I had used all scraps from "Very Merry Christmas" paper collection by Echo Park . . . but I messed up on resizing my tree paper, so I had to open a new pack of the same paper to get a full sheet of the tree paper.  Yes, I said a new pack . . . for those who know me and where I have bought a lot of my paper, understand how I may have 2 or more sets of different paper collections.  Right, my fellow CCers?  For my image, I colored it with my Copics---YG63 & YG67 for the tree, C1 & C3 for the mouse and R000 & R11 for his ears & nose. I used Smooch Pearlized Ink in yellow for the star. And for the ornaments & garland, I used Stickles in Christmas Red and Silver. I also distressed my paper with Walnut Stain distress ink and used Helmar's Scrap Dots to give more dimension to my layers.

All-in-all, I am VERY happy that I had to do a new card because this one turned out even cuter than the first. I think I may do my own Christmas tree this year in a two-tone theme . . . yes, I am late getting mine up this year.  But my family and I plan on doing it this weekend. :)

Till the next time I'm up in the night.  Kathy 


Tuesday, December 10, 2013

Mid-Challenge Inspiration

Hi, all my crafty friends and family!!!  

I am here today to remind you that you still have one (1) week to complete a project for Clear It Out Challenge.  The theme is "Christmastime" and the stash item is "make room for presents" (or basically, "Anything Goes" or even something with presents on it).  Here's a little something I put together as inspiration for you:


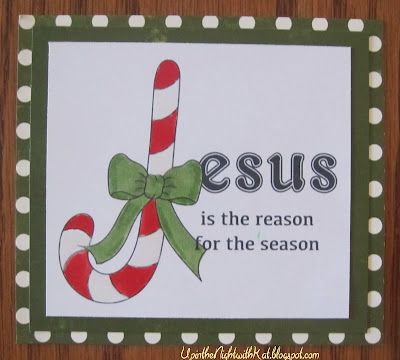
As I mentioned last week, I love having homemade tage to go on my presents.  And when I saw this digi image "Inspirational Candy Canes" from Stampart Design by Kathryne, I knew I had to make not only some cards with it, but also some tags for my presents as a reminder of the true reason  of Christmas.  

Since there were four (4) different images in one (1) document, I cropped each one so I would have four (4) different images to choose from . . . two (2) with a sentiment and two (2) with just candy canes.. Also, if you look real close, you will notice the white stripes on the candy cane are a bit different from the white paper . . . this is because I used Smooch Pearlized Ink in white for the stripes to help them stand out on the white paper.

So now I have some GREAT tags for my presents that not only will go with my presents, but will also be a gentle reminder of the true "Reason for the Season".  Have a very Merry Christmas!!!

Till the next time I'm up in the night.  Kathy


Saturday, December 7, 2013

HIMCR #127 - Holiday Colors

Hi, all my crafty friends and family!!!!


Is everyone staying warm enough this past few days?  I know, it's been challenging here trying to stay warm with the temperatures being in the teens during the day and low single digits (and sometimes below 0) at night . . . in fact, I had to put two (2) more quilts on my bed last night because the temp dropped so low.  I pray that those of you who are in the path of the ice storm that is hitting our nation are staying inside where it's safe and, hopefully, warm.  Okay, enough about the weather. :)

Here it is the 1st Saturday of the month and do you know what that means?  It means it's time for another Hiding In My Craft Room challenge and since it's the 1st Saturday of the month, it means the challenge it a "Color" challenge . . . so this time we challenge you to use your Holiday Colors!    

And this time, HIMCR is giving away this A-W-E-S-O-M-E Christmas package ---


I got the idea for the card I did for this challenge from a card my mother-in-law gave me for my birthday . . . it was actually kinda funny because as she handed me the envelope with the card, she said "Happy Birthday . . . and I'm sorry."  When I opened it, I was like "Sorry for what?  I LOVE this!!!" So after searching the internet, I found a SVG file to make one  from App.box.com (https://app.box.com/shared/5a7tp4rhaj). Here's how it turned out:


I used scraps for this card and printed "A friend is like a good bra" sentiment on the inside:

"A Friend is Like A Good Bra . . .
Hard to find
Supportive
Comfortable
Always lifts you up
Makes you look better
Always Close to Your Heart!!"

And the back is a thong with a little S.W.A.K. (lips) tattoo . . . but since I didn't want to hurt anyone's sensibilities, I decided not to show the picture of it. :)

Remember, you have one week to get your "Holiday Color" project in to be eligible for the Christmas package.   Have a GREAT (and warm) weekend!!!

Till the next time I'm up in the night. Kathy


Tuesday, December 3, 2013

Clear It Out Challenge - Christmastime!

Does anyone know what time it is?

That's right . . . 

It's CHALLENGE time!!! 


Hi, all my crafty friends and family!!!  Has everyone recovered from Thanksgiving yet?  I hope so because once again, it's challenge time over at Clear It Out Challenge.  Time to clear away the dishes, clear away any remaining Thanksgiving "stuff", and clear away anything else that has stockpiled in your crafty space this past week or so . . .   and get your crafty on.  And usual, our A-W-E-S-O-M-E-L-Y, A-M-A-Z-I-N-G leader, Laura,  has come up with another great challenge for us . . . it's so easy, peasy!!!  So get out your paper, scissors, glue  and . . . 

 Are you ready???

I didn't hear you . . . 


Are you ready???

Okay, it's challenge time!!!

Theme:  Christmas time (anything goes)
Stash:  Make room for your new Christmas presents 
(basically, anything goes or you can add a present) 

You have 2 weeks to play (till Dec. 16th)

Our sponsors this challenge are:


When I saw this week's challenge theme and stash item, I thought to myself "I wonder about making tags for Christmas presents?"  So off I went and I found a cute tag from Bugaboo called "Christmas presents-Tags".  How perfect is that?  Here's what I came up with:


As you may notice, I don't have names on these tags yet . . . that is because every year I like to have a dozen or so "generic" little gifts ready just in case an extra guest comes by or I just want to do a little extra for someone or help a friend or family struggling to make ends meet or just to brighten their day. Whatever the reason, I always try to make sure I have them and these tags work PERFECT to help make my "generic" gifts more personable, too.

But the BEST thing about this tag digi stamp is not only can I make it any size I want, BUT I can color or decorate it to coordinate with my gift or wrapping paper.  I am kinda funny that way . . . I like to have my tags match . . . at least somewhat.  So this time round I inserted the digi into a Word doc and make it 3-inches high.  Then I copy and pasted it until I had a whole page of tags  and I ended up with 9 tags on one sheet . . . it's a start for now.


Till the next time I'm up in the night.  Kathy


Saturday, November 30, 2013

HIMCR #126 - Freestyle

Hi, all my crafty friends and family!!!

I hope and pray everyone is having a Happy Thanksgiving and having safe travels if you are out-of-town.

Well, it's Saturday once again and do you know what that means?  Since it's the weekend after Thanksgiving, it means that most of you are probably resting up from a day of Christmas shopping on Black Friday and fighting the crowds hoping to get some GREAT bargains while trying to steer clear of the "free-for-all" or "anything goes" mentality that some of the shoppers get when trying to get the last "hot" item.

But do you know what else it means?  That's right!!  It means it's time for another amazing challenge over at Hiding In My Craft RoomThis week the theme is "Freestyle" (or meaning "anything goes") . . . and don't worry, there won't be any "fighting" mentality there.  Only some good old-fashioned competitiveness since it is a challenge after all. :) 

Since it was Thanksgiving week, I decided to do a simple project while adding more cards to my Christmas card "stash".  Here's how it turned out:


I call it my "Ribbon Tree" card because I used "ribbons" of paper . . . actually, it is 3/4-inch wide strips of paper.  I used "Yuletide" from the Festive paper collection by Authentique for the strips and "Merry" from the same collection for the background.  The "holiday CHEER" stamp is a miscellaneous one from my stamp collection and the star was punched with a star punch from glitter paper.  I alsu used Walnut Stain distress ink on the edges.  And "Voila!" I was done . . . pretty simple, don't you think?  It actually was once I got the widths of where I needed to fold or wrap my strips. :)

Hope everyone has or has had a Happy (and safe) Thanksgiving!

Till the next time I'm up in the night.  Kathy

Tuesday, November 26, 2013

Mid-challenge inspiration - Snowflakes

Hi, all my crafty friends and family!!!  

I am here today to to remind you that you still have one (1) weeka to complete a project for Clear It Out Challenge.  The theme is "Anything Goes" and the stash item is a snowflake.  Here's a little card I put together for you:


This darling image is from QKR Stampede.  And once again, I wanted to achieve an old fashioned look like I did with last week's card by printing on paper from the "Peaceful" paper collection by Authentique and using my watercolor pencils.   I also used dry glitter by Tim Holtz . . . I really need to figure out how to take better photos to show the glitter.  If anyone has some suggestions, I am all ears . . . well, eyes as it is in this case. lol

Remember, you still have a week to get your project(s) entered into Clear It Out Challenge.  (And hope you all have a Happy Thanksgiving week and weekend!!!)

Till the next time I'm up in the night.  Kathy

Saturday, November 23, 2013

HIMCR - Thanksgiving/Thankful

Hi, all my crafty friends and family!!!

It's Saturday once again and do you know what that means?  That's right!  It means it's time for another amazing challenge over at Hiding In My Craft Room. This week the theme is "Thanksgiving" or "Thankful" . . . it can be any project representing what you are thankful for either by the word(s) "Thanksgiving", "Thankful" or "Thanks" or even by a picture of what you are thankful for.l  So get out your paper and glue and let's see what you can come up with

When I think of what I am thankful, it is really hard to decide on just one because I have been blessed with so many things.  But after going through some pictures to scrap, I knew I had to do a layout representing what I am most thankful for . . . being ALIVE!  As many of you know, I had been diagnosed with cancer when my daughter was only 3 weeks old and was give a 0-5% chance of making it.  Let alone making it to the 5-year cure mark.  And here I am 17 years later . . . cancer-free!!!

So with my picture in hand, I headed to my crafty space and got to work.  Here's what I came up with:


This layout has several meanings to me.  The broken resin frame pieces and torn papers represent how I was broken from the chemo but then put back together into something even better though my faith.  The color green represents to me new beginnings because this picture is one of my dd and I about one (1) month after I got done with chemo . . . we were playing horsey to the music on her little cassette player, which is the meaning of using musical notes and paper in the layout. The cut out word "BEAUTIFUL" for how I felt life was at that moment and how my family members saw me even though I did not look like my former self. There are other subtle meanings, but I won't go into all of them right now. :)

The first thing I did for this LO was create the background using gesso and Faber Castell gelato (in green).  I put a small amount of the gelato in water to make a watercolor like paint . . . and then applied it over the gesso that I had already applied to my paper and allowed some drips here and there.  Then I took scraps of paper and glued them down in various spots . . . then applied a bit more gesso to the edges to blend them with the background and a little more of my watered gelato.

Once everything was completely dry, I put the LO together by adhering my broken pieces of resin frame, putting flowers here and there, cutting one flower in half and putting part next to the photo, and adding some string (colored by the green gelato) to the flowers.  


I also added a rub-on "Treasure every day" above my photo and rhinestones in various places


I also  added a few more flowers that I colored with the gelatos and gesso.


When I was all done, I used Thickers for my title "Thankful". and splattered a bit more of of the watered gelato around the LO and then some black drawing ink. Voila!  I was done!


In a way this was a hard layout for me to do, but it was also a great one . . . both reasons is because it made/helped me remember a difficult, but happy time in my life.  One that I do't take for granted. 

Till the next time I'm up in the night.  Kathy

PS  Funny side-note --- Doing this layout also made me realize how when I love something, I keep it forever . . . can you believe I still have (and wear) those green PJs?   lol  What can I say? . . . they are so comfy!!!  Talk to you all later!!!

Tuesday, November 19, 2013

Clear It Out Challenge - Anything Goes

Does anyone know what time it is?

That's right . . . 

It's CHALLENGE time!!! 


Once again, it's challenge time over at Clear It Out Challenge.  Time to roll up those sleeves, get out your markers and get your crafty on.  And usual, our fearless leader, Laura,  has come up with a GREAT challenge this time . . . so easy, peasy!!! 

 Are you ready???

I didn't hear you . . . 

Are you ready???


Okay, it's challenge time!!!

Theme:  Anything Goes
Stash:  Snowflake

You have 2 weeks to play (till Dec. 2nd)

Our sponsors this challenge are:


For this week's challenge, I picked out a sweet "Winter Scene" from Digi Darla.  Since it reminded me of old days past, I wanted to give it an "old" feel.  So I printed my image on some paper from "Peaceful" paper collection by Authentique and used my watercolor pencils on it.  Applied a little glitter here and there on the snow.  And here's what I got:


I love how the cream and black sets off the touch of color I added to the image.  Though I really do need to figure out a better way to take pictures with glitter . . . you can't see it very well, but it's there.

Till the next time I'm up in the night.  Kathy

Saturday, November 16, 2013

HIMCR #124 - Die Cuts

Hi, all my crafty friends and family!!!  

It's Saturday again . . . and do you know what that means?  

It means it is time for another fabulous challenge at Hiding In My Craft Room.  This week the them is "Die-Cuts".  You may use any type of die cut . . . pre-cut or homemade with your own die-cutting machine (CriCut, Cameo, Slice, etc.).  And you may create any type of project (card, layout, mixed media, altered arts, etc.) as long as there is a die-cut on it.  Remember you have one (1) week to submit your projects on HIMCR to be eligible for one (1) of the two (2) CriCut cartridges being given away . . . meaning, there will be TWO (2) winners this week!!! Pretty AWESOME prize(s), isn't it?  So let's get busy and see how many AMAZING entries we can get this week.  :)

I went back and forth trying to decide what type of project I would do for this week's challenge.  I finally decided to do another CAS (clean and simple) layout because even though I really do love my mixed media layouts . . . well, let's just say that with the number of photos I have, I would be busy for a few decades if I did every layout that way (not to mention, they do take up a bit more space).  Plus, I decided I would get a head start on my 2013 Christmas pictures by having a few layouts ready for pictures . . . which is why you will see just photo mats on my layout this time. 

So using scraps my sister gave me from a kit she did along with some solid cardstock from my stash, here's what I came up with:


I used a die-cutting machine (my CriCut, this time) to cut out my title "Merry & Bright" and the "25 days of December" title was a die-cut leftover from what my sister did.

I fussy-cut out some penguins and little trees . . . and I place three (3) of the penguins at the bottom corner to represent my family and the two (2) trees to represent my dd's two (2) birds. :)

I used a corner punch for photo corners and used scrap dots to adhere them to the layout . . . I do this so they will be up, off my photos and it makes it easier to put photos on a layout that I make ahead of time.

I also placed another penguin that I fussy-cut, by the "25 days of December" die-cut. Voila! I was done. 

Remember, you have one (1) week to get your projects entered at Hiding In My Craft Room for our "Die-Cut" challenge in order to be eligible for one (1) of two (2) CriCut cartridges being given away.  Good Luck!!!

Till the next time I'm up in the night.  Kathy