CLICK HERE FOR FREE BLOGGER TEMPLATES, LINK BUTTONS AND MORE! »

Saturday, June 29, 2013

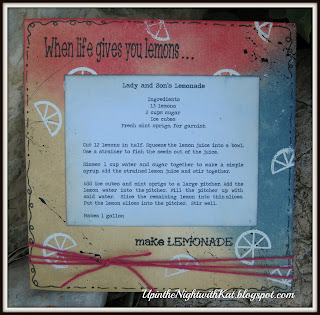
When life gives you lemons . . .

make LEMONADE!!!

Today I want to share with you a recipe card I did for a "Summer Drink" recipe card swap,  When I ran across this swap on YouTube, I knew immediately what recipe I wanted to do . . . Lady & Son Lemonade. And, with that decided, I knew I wanted to use my new stamp set "Joyful Jar Drinks" from Get Inky! Stamps  by Blue Moon Creation

So to the drawing board I went.  For this recipe swap, not only were our cards to be 6x6, but we were challenged to use a "recipe" of sorts for the card . . . use patriotic or red, white & blue, have some embossing and twine.  Pretty challenging, don't you think?

Well, I since didn't have enough patriotic paper or paper in blue, red & white/cream for 20 identical cards, I decided to try to ink my background.  After a few practice cards, I finally came up with a combination I liked.  Here's how my card turned out:

Supplies:
Cream Cardstock
Barn Door, Antique Linen, & Stormy Sky distress inks (for background)
Black Soot distress ink (for saying)
"Joyful Jar Drink" stamp set from Get Inky! Stamps by Blue Moon Creations
China Black Twinkling H2O
Pink Sorbet twine from The Twinery
Zig Millenium in black pen 
Frost White ink by ColorBox
White embossing powder by Zing!
Helmar 450 Quick Dry Glue

First I inked my background . . . but I didn't do the whole card, just the outside 2" because I knew my recipe would cover the middle of the card. :)  Next was the saying and the lemons . . . scattering the lemon wedges in no certain order.  I had planned on embossing the saying but the ink didn't show up as good as I wanted.  So I embossed my lemon wedges instead by using the white ink instead of embossing ink and the embossing powder . . . it made it show up even better than it would have if I had just used the embossing ink and power,  After all that embossing, I didn't feel like embossing anything more, so I just stamped the saying. :)

After that, I attached my recipe using Helmar 450 Quick Dry Glue . . . I love this stuff!!!  Even though does dry real quick, you can take a few seconds to readjust if needed.  Then I doodled around the edges, splattered Black China Twinkling H2O here 'n there and, finally, added the twine, it was done.

Now to get them ready to be mailed . . . but like the title says "When life give you lemons . . . make lemonade".  This is what I may have to do.  I'm in another recipe swap and am waiting to hear back to see if my cards made it...tracking doesn't show any movement since I mailed them 2 weeks ago.  And even though it is a different theme, I think these will work if I need to send these in place of the others . . . I would just have to make a few more.  Then next week I'll make another set of 20.  :)  NO problem!!! :)

I have a blog post for this other swap but can't post it until I the cards have been swapped out . . . everyone likes to be surprised with what they are going to get. :)  So keep an eye out for it.  Until then, remember  -

"When life gives you lemons . . . make LEMONADE!!!"

Till the next time I'm up in the night.  Kathy


Thursday, June 27, 2013

Cocoa Creators Challenge #6

Hi, it's me again!  Today I want to share with you two (2) cards I did this week.  One was for my hubby and the other I did to add to my stash of birthday cards. :)  I am submitting both of these in Cocoa Creators Challenge #6 on CropChocolate.com

As many of you know, I have been playing around with Tim Holtz's Blueprint stamps and Twinkling H2Os.  Well, for this first card, I used the mini mustache (the large is from the "Ringmaster" stamp collection) because it reminded me of my hubby . . . I have only seen him 1/2 dozen times without a mustache in the 20 some years I've known him.  When I saw this stamp, I knew I had to do a card for him and it worked perfect with "Times and Seasons" paper collection by Echo Park.  Another thing about my hubby is he loves to dress up and wear a tie . . . so what could be most fitting than to have a tie on this card, too. (Oh, I also used a Twinkling H2O on the mustaches.)  Here's what I came up with:


The next card is one I did to add to my stash of birthday cards.  It seems like I am always needing a birthday card . . . and even though I prefer to make them specifically for each person, sometimes time does not permit it.  With this card, I used "Trendsetter" by Fancy Pants, baker's twine and Twinkling H2Os in Sunburst and Fuzzy Peach.  I am in love with the H2Os when it comes to "painting" my images . . . though I need to get a smaller brush to do better detail. :)  Here's how it turned out:


All-in-all, I am pretty happy with these two cards.  I haven't given the one card to my hubby yet because I'm waiting for the "perfect" moment. :)

Till the next time I'm up in the night.  Kathy

Sunday, June 23, 2013

Polka or not to Polka . . .

That tis the question I ask myself . . .

but before I go on to my card I would like to share with you, it's time to see who won the set of Tim Holtz mini blueprint stamps that I was giving away for leaving a comment the other day . . . 

{{drum roll . . .}}

and the winner is . . .
Erin (CelticCrafter)

Congrats!  Erin, please either PM me on CropChocolate or on Facebook with your real name and mailing address along with the choice of which set you would like to have . . . either the holiday set (with Valentine's Day, Easter & 4th of July) or the one with sewing items, travel, & key/lightbulb/lock/gears).  If I don't hear from you by next Friday, June 29th, you will lose out on this and I'll draw another name.  Thanks!

You know, I'm in a really giving mood today, so I am going to draw another name for the TH mini blueprint stamp that Erin (CelticCrafter) didn't choose.

{{drum roll - again . . .|}}
mommyx2

Congrats to you, too, Mommyx2!!!  Please PM me on CropChocolate or on Facebook with your real name and mailing address and I'll get the extra set of TH mini blueprint stamps to you. :)

So on to my project . . .

A week or so ago, I posted I had been playing around with my Tim Holtz Birthday blueprint stamps.  I have been having so much fun coloring these stamps with my Silks Acrylic Glazes and Twinkling H2Os . . . so many options and variations.   Which brought me to a decision I needed to make for this card I just made . . . polka or not to polka. lol

With this next card, I used the gift stamp.  As many of you know, I always do at least two (2) of each card I make . . . one (1) for a "sample" so I can remember what I used on a card and one (1) to give away.  But while working on my 2nd card, I decided I wanted to do something just a little different on it by adding polka dots to it.  Now I can decide which of the two (2) I like the best. :)   Here's how both cards ended up:

Card #1

Card #2 (with polka dots)
Supplies:
Red card base 
Trend Setter paper collection by Fancy Pants
"Aqueduct" Core'dinations cardstock
Tim Holtz Birthday Blueprint stamps
Tim Holtz Quote stamps
Twinkling H2O - African Jade and Deep Coral 
Liquid Pearls - Rouge
"Caribbean" twine from The Twinery
misc. red button

Once again, I used my Twinkling H2Os for the painting/coloring by first spraying a little water in them (I usually spray 3x and let it set for a few minutes to "activate") . . . and love how they turned out.  But I have learned to go slow and to use a small paintbrush.  If I don't, then it's hard to stay in the lines and I end up feeling like I'm back in Kindergarten. :)

So what do you think?  Polka or not to polka . . . 

Till the next time I'm up in the night.  Kathy

Sunday, June 16, 2013

What's the scoop?. . .

With Father's Day literally just around the corner, I have been trying to come up with a unique or at last  creative card for my father-in-law.  After checking my stamp collection, I decided to try out a digi-stamp instead.  So after being directed to Bugodoo Digi Stamps by Clear It Out Challenges, I found the Y-U-M-M-I-E-S-T digi-stamp called "Make It Snappy...What's the Scoop".  (Okay, I actually found more than one (1), but I'll deny it if hubby asks.  Though, since digi stamps don't take up any actual physical space, so it should be okay . . . I just may need to get a few more bytes. lol )

Anyway, so while I waited for my new stamp(s) to be emailed to me (another BIG plus to digi stamps - NO waiting days and days for an order to arrive - instead, instant gratification), I went ahead and looked around at my supplies, trying to get an idea as to how I wanted to go about this card.  My father-in-law is really a very basic, simple person . . . and I mean that in the nicest way.  He just doesn't like the fancy stuff . . . my hubby is the same way except for when it comes to cars. lol

So after downloading my new stamp and playing around with my Silks Acrylic Glazes and Twinkling H2Os, I ended up deciding to paper-piece this stamp.  The reason being is I wanted to make the ice cream vanilla and it was hard to do so on white paper. :)  Plus, I wanted to give it a bit more dimension.  So I got out my Authenique 6x6 paper pad and went to work.  After printing and much fussy cutting, here's how it turned out:


Supplies:
"Make It Snappy - What's the Scoop" didi stamp by Bugadoo Digi Stamps
Authentique "Fresh" 6x6 paper pad
Liquid Pearls - Rouge & Baby Blue
Snow Writer by DecoArt
"Maraschino" twine from The Twinery
misc. spoon charm

If you look close, you can see that I added a little spoon charm.  I thought it fit with the stamp since it looks like the ice cream is melting.  Plus, my father-in-law sometimes uses a spoon to eat his ice cream cones.  and I used my Snow Writer by DecoArt for the whipped cream on top of the ice cream cone to give it more of a "fluffy" look to it.  So all=in-all, I am really happy with this card . . . I hope my father-in-law likes it, too.

I am also going to enter this in Clear It Out's Challenge.  The theme is male cards and the stash item is metal. I know ice cream may not seem like a "male" thing, but when I think of ice cream, I think of my father-in-law.  And the metal from my stash is my spoon charm.

Till the next time I'm up in the night.  Kathy


Saturday, June 15, 2013

Let's get inky . . .

A month or so ago . . . well, maybe it's been 2 months now . . . I took a Tim Holtz card class at my LSS.  I was so excited to refresh my skills and hoping to learn a new trick or two.  Well, I was not disappointed.

We used several of Tim Holtz's dies and stamp sets during the class to make at least 3 cards.  I ended up making 8 total.  But since I've gave all of them out to family and friends, I ended up making one of each of the cards again so I could share with my Facebook peeps.  And so I could eventually share here. :)

Card #1
Supplies:
Black Coordinations cardstock (with blue on opposite side)
Inkssentioal craft tags - giant tags #12 size in manila
Stamper's Anonymous "Stuff to Say" stamps  #CMS110 by Tim Holtz
Tim Holtz Heart & crown die cut
Tim Holtz music tissue paper
Tim Holtz safety pin or clasp
Snug Hug Crinkle ribbon
Vintage Photo distress ink
Cranberry alcohol ink
metallic-like chipboard

Card #2
Supplies:
Black Coordinations cardstock (with blue on opposite side)
Inkssentioal craft tags - giant tags #12 size in manila
Stamper's Anonymous "Stuff to Say" stamps #CMS110 by Tim Holtz
TH Gears and gadgets embossing folders
TH gear die cuts
Brushed Pewter distress stain
Black Soot distress ink
black enamel
Snug Hug crinkle ribbon
stapler

Card #3
Supplies:
Black Coordinations cardstock (with blue on opposite side)
Inkssentioal craft tags - giant tags #12 size in manila
Technique Tuesday "Life in Pictures" stamps by Ali Edwards
Brushed Pewter distress stain
Vintage Photo distress ink
TH camera die cut
Snug Hug crinkly ribbon
stapler

The class was a really fun class . . . fast paced, but FUN!!!  As I stated above, once I got home, I made a few more cards . . . one because the ones I had made in class were gone to family and friends . . . but also so I could see if I could remember what I did in class without instructions to help me. I think I did a pretty good job at remembering and at adding a thing or two of my own. 

Till the next time I'm up in the night.  Kathy


Friday, June 14, 2013

Playing around . . .

Several months ago, I bought some of Tim Holtz's blueprint stamps and, with so many birthdays coming up this next month, I decided to pull out the Birthday Blueprint stamps and play around with them. Here's what the stamps look like:

I received a package of the "Trend Setter" paper collection by Fancy Pants and decided to use my Silks Acrylic Glazes and Twinkling H2Os instead of my Copics to color because . . . well, because the colors of the glazes and H2O are just so Y-U-M-M-Y!!!  And the matched so well . . . so much that it looked like to me that they were made for each other. :)

Here's the first card I did:

Supplies:
"Trend Setter" paper collection by Fancy Pants
Twinkling H2Os - African Jade, Deep Coral and Sunburst
Vintage Glitter in Bubblegum Pink
Buttercup Baker's Twine from The Twinery
misc. button

With this card, instead of using Distress Ink to distress the edges, I used my African Jade Twinkling H2) to distress the edges.  I think it gave it a little some extra.  And for the frosting on the cupcake, I used Glossy Accents to hold the glitter down.  It almost looks good enough to eat. :)

One thing with the Twinkling H2Os that surprised me was that when I took the lid off, it was hard on the inside.  To use the H20s, you have to spritz it with water and then let it set for a few minutes to "activate" it and then when  you are done, replace the lid and it will reharden.  AMAZING!!!  I just LOVE my H20s. :)  Here's what it looks like after it's been spritzed and then rehardened:


For the 2nd card I did, I used the present stamp from the Birthday Blueprint stamps.  Here's how it turned out:

Supplies:
"Trend Setter" paper collection by Fancy Pants
Silks Acrylic Glazes - Fuzzy Peach and Yellow Roses
misc. twine from stash

This card I kept very simple because I think much more would take away for the feel of the stamp . . . I wanted to showcase the stamp and not overpower it with a lot of embellies.  I think I did a pretty good job at that . . . what do you think?

I'm going to be working with the Balloon stamp or the Present stamp next today and over the weekend.  Hopefully, my mojo keeps up with my desire to create. :)

Till the next time I'm up in the night.  Kathy

{{added Saturday, June 15th at 1:54am}}  Oh, one more thing . . . I feel like giving away something.  Yes, again. :)  Become a follower and leave me some lovin' in order to be put into a drawing for a new set of Tim Holtz's Mini Blueprint stamps.  The winner will have a choice between two (2) different sets . . . the one with Valentine's Day, Easter & Patriotic stamps and the other has the mini stamps that include sewing items, traveling & a lightbulb.  Sorry, I can't think of their names right now, but when I do, I will post the names of the sets. :) 

I will draw a name and announce here next Friday, June 21st.  So check back here to see if you are the lucky winner. :)

Once again, till the next time I'm up in the night. Kathy

Saturday, June 8, 2013

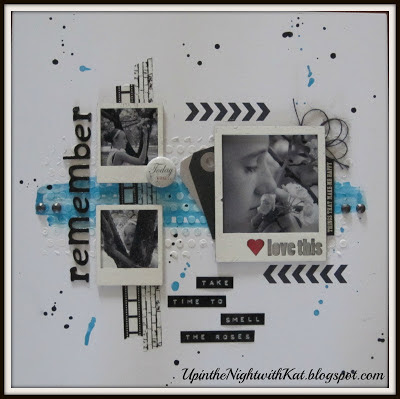
Remember . . . take time to smell the roses

Hi, all my crafty friends!  This past week or two, I have been working on a layout of my niece, BriAnn.  Because the pictures were in black and white, I wanted to do more of a mixed media type layout.

I got my inspiration for the colors from UmWowStudio's business card . . . I just LOVE the turquoise and black look.  Here's how the finished layout looked:


To start this layout, I cut out a "punchella" stencil on my Cameo . . . it was actually 12x12, but I cut it into three (3) 4x10 pieces.  Then using modeling paste from Studio 490, I applied it to the middle of my paper.  After letting it completely dry (I waited till the next day just to be sure), And while I waited for the embossing paste to dry, I painted my chipboard polaroid frames from UmWowStudio with Mister Huey's Mist in white.  Once the embossing paste was dry, I took some acrylic glaze in turquoise and applied it to some of the embossed area.

I then figured out where on my layout I was going to put my chipboard polaroid frames from UmWowStudio so I would know where to stamp my chevrons and place my washi tape.  I used the chevron stamp from VLVS!.  (The stamp actually had 9 chevrons but I only wanted 6, so I covered 3 with paper when I inked the stamp.)  The filmstrip washi tape was from Trendy Tape and the brick washi tape was from PaperIssues' Etsy store.  After that, I took some of my new Charcoal twine from The Twinery and unraveled it into 4 strings because it was a bit too thick for the look I wanted and I placed it behind the top right corner of my pictures and place 2 tags on the left.  I also placed a bright pink piece a paper beneath the heart on the large polaroid frame.  NOTE:  To adhere my chipboard polaroid frames to my layout, I used Helmar's 450 Quick Dry Glue . . . I am absolutely in LOVE with this glue!  It has a good strong hold and it does dry quick . . . though you do have a few seconds if you want to change  your mind. :) 


For my big title "remember", I used Thickers in "Flakey".  And  I used my embossing label maker to make "take time to smell the roses" title pieces.


And last, but not least, after adding some bling from CTMH and a badge, I flicked my turquoise paint around my LO.  And then did the same with my Silks Black Ice acrylic glaze.   


So what do you think?  I am pretty please with it myself.  And I also have another one to give my sister . . . it was my "practice" layout. :)

Till the next time I'm up in the night.  Kathy

Friday, June 7, 2013

Viva Las VegaStamps! DT Tryout

Many of you have heard me talk about VLVS! lately . . . and that they were have a Design Team call going on.  Well, those who know me, know that I like to try even if I know my "style" probably isn't the style a company is looking for.  I like not only like to do it for the experience, but it gives me an excuse to play in my scrappy place. . . . okay, who am I kidding?  I don't "need" an excuse to play. lol

Anyway, even though I had placed an order for some of their awesome stamps, I decided to go ahead and use what I have along with some other stamps in my collection since I was unsure if my new stamps would arrive in enough time for me to do three (3) new projects . . . I know what you are thinking, "You could have pulled an all-nighter or two to do it."  Sorry, but I am NO spring chicken anymore.  lol 

The first project I want to share is a layout of my niece, BriAnn.  I got my inspiration from UmWowStudio's business card . . . I LOVE the color scheme of turquoise and black. :) I used VLVS! chevron stamp along with UmWowStudio's chipboard polaroid frames.


I also used Studio 490 Embossing paste with a stencil I made on my Cameo.  Then I painted it with turquoise paint.  The film strip washi tape is from Trendy Tape and the brick washi tape I got from PaperIssues on their Etsy site.  I also used the new solid color twine in Charcoal from The Twinery . . . but it was a bit too thick for the look I wanted, so I unraveled it since it was 4-ply. To finish it off, I splatted some turquoise paint along with Silks Black Ice acrylic glaze.  I really like the way this turned out.

My second project is a tag I started about a month ago.  I had been playing around with my Faber Castell gelatos . . . well, as much I could considering I only had the blue tone and green tone sets.  But once I got the background done, I knew it would be perfect for my UmWowStudio chipboard cattail.  I used pearlized ink for the stems and flocking in nutmeg for the the tops.  I also used a script stamp (not sure of brand) and the small Spotted Butterfly from VLVS.  Here's how it turned out:


The third project I want to share is a canvas I did using tissue paper, stamps, archival ink, modeling paste, paint (willow, light green, antique linen, espresso and black), chipboard and twine.  I used a music note stamp (same set as the script stamp from above, but no name with them).  I also used the small Spotted Butterfly by stamping it on tissue paper and adhering it on top of the modeling paste then layering watered down paint on top of that.  Though it is a bit difficult to see in the picture, I was trying to get the washed out effect . . . which I think I did.   Here's how it turned out:


Well, "That's it folks!" . . . wish me luck!!!

Till the next time I'm up in the night.  Kathy